A synthetic wig should dry on a support that allows air into the cap without pulling it wider. For many everyday styles, that means an open plastic or wire wig stand rather than a solid styling head. Check the wig maker's instructions first, blot out excess water gently, and leave the wig uncovered until the cap and hair are dry. Dry-looking ends alone are not a reliable reason to put it back in a storage bag.
The purchase decision is small but consequential. A stand can look suitable in a photograph and still leave long ends resting on the counter, catch the lace on a rough joint, or require you to stretch the cap over its frame. Those are things you can check before the next wash. You do not need an electric dryer or a complete salon setup to make a better choice.
Start with the instructions for your particular wig
Find the brand, style name, fiber description, and care directions before following a drying tutorial. A conventional synthetic wig, a heat-friendly synthetic wig, and a human-hair wig do not automatically share the same routine. This guide concerns removable synthetic wigs after washing, not bonded hair systems or advice about drying an installed wig.
Manufacturer care instructions for conventional synthetic wigs typically specify gentle towel patting followed by natural air drying on a plastic or wire stand, and often prohibit blow drying for the products they cover. That is a useful starting point, but it does not turn every online synthetic-care tip into a rule for every brand.
Even the timing of combing can differ. Some heat-friendly washing instructions include gentle combing before air drying, while other routines advise waiting until dry. Follow the instructions for the actual fiber and construction you own rather than combining the most convenient steps from several tutorials.
If the care card is missing, ask the seller for the correct version. A product description saying "heat resistant" is not permission to use any dryer setting. Until the maker clarifies its limits, avoid introducing heat as a shortcut.
A drying stand and a styling head do different jobs
A solid mannequin head gives a stylist a surface for securing and shaping a wig. An open drying frame leaves space beneath the cap. That difference matters when deciding where to put a freshly washed piece, even if both accessories are sold under the broad label "wig holder."
The useful principle is access to air beneath the cap — not a guaranteed drying-speed improvement for every wig. Guidance written for human-hair styling should not be transferred to ordinary synthetic fiber.
Size matters independently of material. A common warning in drying tutorials is against placing a wet cap over a head larger than its intended size. Treat that as a practical fit warning, not proof that every open frame is automatically the correct size.
Before washing, place the dry wig on the proposed support gently. It should rest securely without having to pull the opening wider or force the lace over a protruding edge. If it needs that force while dry, choose a different support rather than expecting wet fabric to tolerate it.
| Support | Most useful role | What to check before drying |
|---|---|---|
| Open collapsible stand | Routine air drying where the maker permits it | Smooth contact points, cap fit, assembly and usable height |
| Open wire stand | Air drying with access beneath the cap | Exposed wire ends, coating condition and stability |
| Solid mannequin or block head | Styling with the correct size and instructions | Whether the maker permits wet use and how the cap is supported |
| Hanging support | Saving counter space when approved for the construction | Where the weight rests and whether the hair hangs clear |
Do not pin through lace or attach a clip to a delicate edge merely to make an unsuitable support work. A holder that requires an improvised attachment has introduced another possible failure point.
Measure the space the wig will actually occupy
Stand height is only one part of clearance. Put the assembled stand on the surface where you intend to dry the wig. With the dry wig resting naturally on it, check the lowest ends, the distance from the wall, and the space around the base. Hair should not pool against a damp towel or be pressed into a corner.
Advertised wig length is not an exact stand-height requirement. Sellers may measure hair from different positions, while curl pattern and the way the wig sits change its hanging length. A direct check with your own wig is more useful than assuming that a stand labeled for a certain length must fit it.
For illustration, if the lowest ends would hang 16 inches below the support point, a setup offering only 14 inches of clear drop is too short for free hanging. Those are example measurements, not a universal sizing rule. Measure from the point supporting the cap to the surface below, not from the top of a decorative base.
Check stability with the dry wig before adding water. Fully seat the joints and set the base on a level surface. Move the assembly away from an edge if a sleeve, pet, or bathroom door could catch it. A taller frame can solve clearance without solving stability.
Inspect seams and joints with your fingers. Do not drag delicate lace across a rough section to see whether it catches. Replace a damaged or poorly finished stand rather than covering a sharp area with something that could slip during use.
Check the product's return terms before wet use. Keep its packaging until you have inspected the assembled frame and confirmed the size. If the delivered item differs from the listing, photograph the parts and label before contacting the seller. There is little reason to discover a missing connector with a freshly washed wig waiting beside the sink.
Set up the drying space before the rinse
Prepare a clean towel, the assembled support, and a surface that can tolerate drips. Doing this first keeps you from balancing a wet wig on an unsuitable object while searching for somewhere to put it. Keep the drying area out of direct sun and away from heaters unless the maker's instructions specifically say otherwise.
After the prescribed rinse, support the wig as directed and gently blot the excess water with the towel. Avoid wringing or vigorous rubbing. The aim is to remove water without turning the towel into a tool for pulling the hair and cap in opposite directions.
Place the wig on the checked support without forcing the opening. Arrange the lengths only as its care instructions permit. Keep the cap uncovered and leave room around it. If a towel beneath the stand becomes soaked, replace it without tipping the frame or dragging hair across the surface.
A recently used shower cubicle may be convenient for collecting drips, but convenience does not establish a suitable drying environment. If it stays steamy or the ends touch a wet wall, choose another location. Likewise, closing the wig inside a wardrobe to keep it out of sight defeats the reason for leaving it exposed to air.
After the wig has dried and been removed, inspect the support for water and product residue. Clean it according to its own instructions and let it dry before packing it away. Keep it separate from dirty brushes or used towels. A collapsible frame is easier to reuse when its joints are clean and all its pieces stay together between washes.
Check the cap before putting the wig away
Use several locations rather than checking one curl at the front. With clean, dry hands, gently examine an accessible section of the inner cap, the nape area, and the hair near the base. Avoid repeatedly pulling the wig off its support or pressing hard on lace and knots.
Look for remaining droplets or clearly damp fabric. If the hair feels dry but a band or inner section still feels damp, leave it out longer. Where a clean, dry cloth can touch an accessible fabric section without rubbing or snagging it, visible moisture on the cloth is another reason to wait.
These are ordinary handling checks, not measurements of moisture content or a microbiological test. A cool sensation can be ambiguous, and the absence of a visible mark does not certify the whole cap. If you remain uncertain, allow more drying time rather than sealing it up to see what happens.
Do not use a fixed number of hours as the final decision. Length, density, cap construction, the amount of water left after blotting, and the room all affect the routine. "Overnight" is useful for scheduling, but it is not a guarantee that a particular wig is ready the next morning.
Once the wig is dry, follow its storage directions. Check the bag or box too, particularly if it previously held a damp item. Do not put a dry wig into a wet pouch. A dust cover belongs to the storage stage; placing it over the wig while drying can obstruct the open setup you selected.
Retail and sourcing references
The following links are retail references for the drying supports discussed above. We may earn a commission from qualifying purchases through these links. They are examples of reusable open frames, not products independently tested here for drying time, cap stretching, or durability, and a listing's dimensions do not establish its drying or odor claims. Confirm the selected variant and pack quantity on the live page.
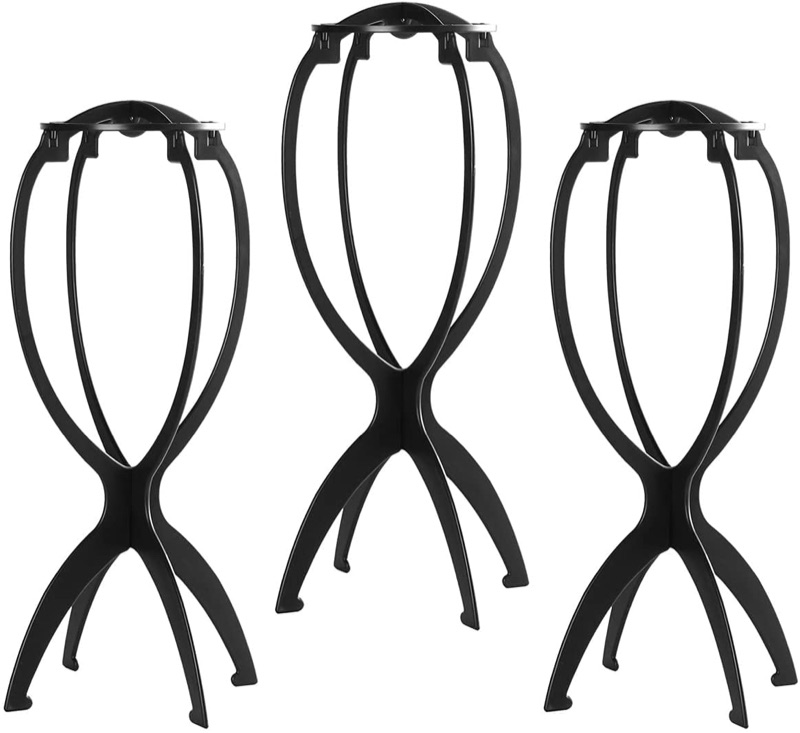
Collapsible wig stand for short wigs, 3 pack
A collapsible plastic wig stand supplied as a three-pack and sized for short wigs. Treat the stated height as a catalog specification to compare with your own clear drop, and check the contact points on arrival before resting a wet cap on it.
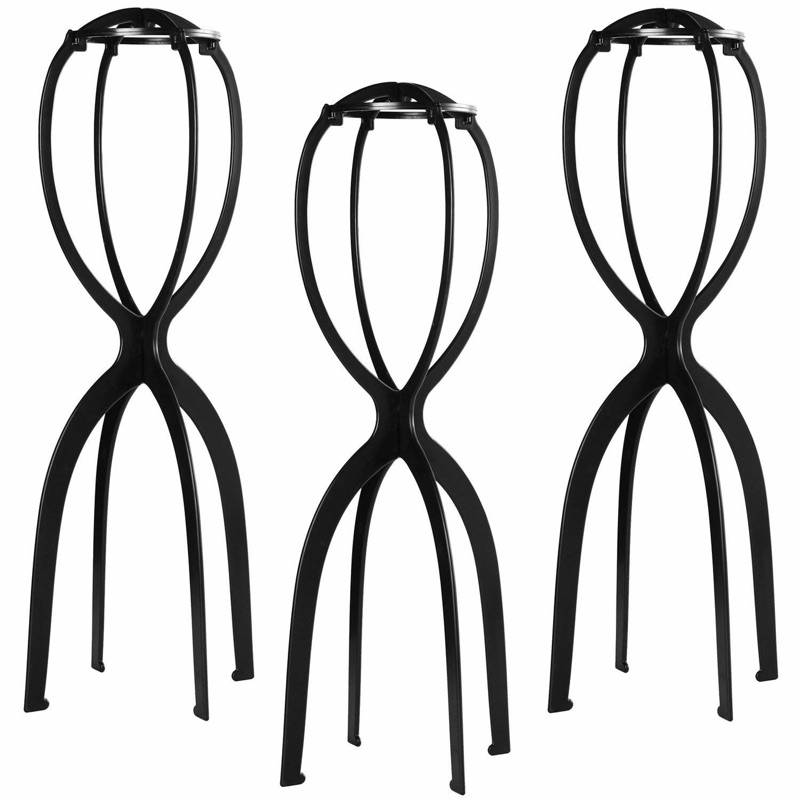
Tall collapsible wig stand for long wigs, 3 pack
A taller version of the same collapsible frame, also supplied as a three-pack, for cases where the shorter format leaves the ends resting below the support. Extra height does not solve stability or clearance on its own, so measure the assembled base first.
Card photos are the current marketplace listing images and may differ from the delivered product; confirm details on the live listing.
If it is still damp when you need to leave
Start by checking the setup. Is the cap pressed against a solid object? Are the lengths pooled on the towel? Has the frame ended up in a closed cupboard? Correct an obvious obstruction gently if the care instructions allow it, then give the wig more time.
Do not assume a high-powered dryer is the next step. Conventional synthetic fiber can be damaged by heat, and a device marketed for wigs may have been demonstrated on a different fiber. A generic maximum temperature in a listing does not establish compatibility with your wig's cap, seams, or style.
If the maker permits a particular drying appliance or setting, follow its instructions for that piece. Otherwise, planning the wash earlier is more dependable than experimenting just before departure. When another suitable wig is already available, use it rather than forcing the freshly washed one into a bag while damp.
Unexplained odor, visible spotting, or a change in the cap deserves separate attention. An odor alone does not establish mold, and perfume does not resolve an unknown cause. Photograph the affected area and ask the wig maker about appropriate care before trying household disinfectants or stain removers.
Compare the short and tall stand formats carefully
For a short wig, a compact collapsible frame can be enough. A 14.2-inch plastic stand supplied as a three-pack is one format to compare with your available drop — but that height is a catalog specification, not proof that your particular wig will clear the counter.
A 19.7-inch version is a candidate when the shorter format leaves the ends resting below, but long wigs can still exceed that clearance. Extra height also makes checking the assembled base and the available space worthwhile.
Both are examples of reusable open frames, not products independently tested here. Choose on fit and handling, then inspect the delivered item before placing a delicate wig on it.
You do not need three stands just because a marketplace pack contains three. Compare the total cost with a suitable single stand from a wig retailer, especially if you own only one piece. Nor does buying both heights make sense when one checked setup already serves every wig in your rotation.
If the listing gives height but no dimensions for the section touching the cap, ask for those measurements before ordering. A photo beside a mannequin is not a size reference for your wig. Also check whether the stated height includes the entire base. Two holders advertised at the same overall height can provide different clearance beneath the actual support point.
For a small bathroom, measure where the base will sit rather than where you hope to squeeze it after washing. If there is no level, protected surface with enough clearance, a tabletop stand may be the wrong format. Ask the wig maker about an appropriate hanging option instead of choosing the tallest frame and balancing it above the sink.
Keep a simple record for the next wash
On the first successful drying cycle, note the wig model, support used, room, and when you found the cap dry. Add anything that needed correcting, such as ends touching the counter or a joint coming loose. Use the record to plan the next wash, not to promise an exact repeat time when conditions change.
A retailer selling a care kit can use the same checks to choose an accessory: assemble a sample, confirm its contact points and dimensions, and trial it with the actual wig models the kit is intended to support. Keep those observations model-specific. Do not label a stand "universal" merely because it held one sample successfully.
For regular use at home, the useful result is straightforward: a stand that supports the cap gently, leaves the ends clear, and fits somewhere the wig can remain uncovered until dry. Once that setup works, reuse it. Buying another storage bag will not fix a drying stage that was never completed.