If a shoulder strap keeps falling, it is tempting to shorten it again. That can help when the strap has simply loosened. It will not move an attachment point that sits too close to the edge of your shoulder, and it cannot make a loose band or a shifting cup fit better.
A racerback clip draws the straps inward at the back. It is useful when the bra stays put and the strap position is the part that keeps failing. This page covers that one accessory — which clips work on which straps, how to attach them, and when the clip is the wrong answer. For the broader comparison of strap grips, shoulder pads and sewn-in grippers, see bra straps that keep slipping.
Start with the bra, not the clip
Pay attention to the whole bra for a minute before reaching for an accessory. A strap that slides and a bra that moves can feel like the same problem until you watch them in a mirror. The band may climb when you raise your arms, one cup may gap, or the elastic may be too tired to hold its adjustment. Each points to a different fix.
Start with the band. On a newer bra, fasten it on the loosest hook that still feels secure. The back should sit roughly level rather than riding up toward the shoulder blades. Published fit guidance links slipping straps with a band that is too large, because a larger band places the straps farther apart. When you change band size, the cup size may need to change with it; going down a band without adjusting the cup can make the bra too tight.
Then look at the cups. If they wrinkle or gape, the breast is not being held in the same position as you move. A gap alone does not tell you what size to buy: cup shape matters, and bodies do not fill every style the same way. Bring the breast tissue into the cup, then move your arms. If the cup and band shift, test a different size or shape before blaming the straps.
Last, inspect the strap itself. Is the slider almost at its limit? Does the elastic feel slack, or does the strap twist? Those clues point to wear or a slipping adjuster. A clip cannot revive elastic that has lost its stretch.
Set the strap length before you add anything
Bring each strap into comfortable contact with your shoulder. It should lie flat, without cutting a groove or hanging loose. A two-finger check under the strap is a reasonable starting point, not a measurement.
If you have already shortened the straps until they bite, loosen them and look again at the band. Pulling the straps too hard tugs the bra upward and shifts the cups, which sends you back to the slider to tighten them more. The band and cups do the structural work; straps are not meant to carry it alone.
Try the adjustment standing, then reach forward and lift your arms. A strap that behaves in front of the mirror but slips as soon as you move is telling you something about its placement or the bra's construction. If only one side falls, compare the two sliders and look for uneven stretch before assuming both shoulders need the same adjustment.
When a racerback clip makes sense
A racerback clip connects the two shoulder straps behind the back, drawing their upper sections inward. That helps when the band and cups feel stable but the strap attachment points sit too far apart for your shoulders — narrow or rounded shoulders are the usual reason.
The accessory is especially useful when you want to keep wearing a comfortable bra under a racerback top, or when a strap drifts off only during a particular activity. It can also keep straps closer together under a garment with narrow shoulder openings. It will not hide every strap under every neckline, and it may change how the back of the bra feels.
Some bras already have a J-hook or another built-in connection point. If yours does, try it first and see whether the altered strap position is comfortable. A separate clip is most useful when the bra has no built-in option, when you need a removable accessory across several bras, or when you want to test a closer strap position before replacing the bra.
Attach it and test the position
Use the maker's directions, because clip designs differ. For a common loop-on style, the directions may ask you to make a small loop in each strap, angle the connector, and slide it over the looped section. Do not force a strap through a narrow opening, and do not cut and sew the bra to make an incompatible clip fit.
To test the result, put the clip on while the bra is off if that makes attachment easier, then wear the bra and check the back in a mirror. If it is hard to reach behind you, secure the clip first and then put the bra on. Make sure both straps are caught evenly and lie flat.
Then move: arms, sit, stand, reach forward. The clip should reduce the outward drift without pulling the band up or creating a sharp pressure point.
Wear it for a short period at home before relying on it for a long day. Remove it if you feel pinching, numbness, rubbing or a pull across the neck and shoulders. Those sensations are not a signal to tighten the bra further. Try a lower or wider connector if one is available, use a different bra style, or stop using the clip if the fit stays uncomfortable. A functional accessory should make the strap position easier to manage, not trade slipping for pain.
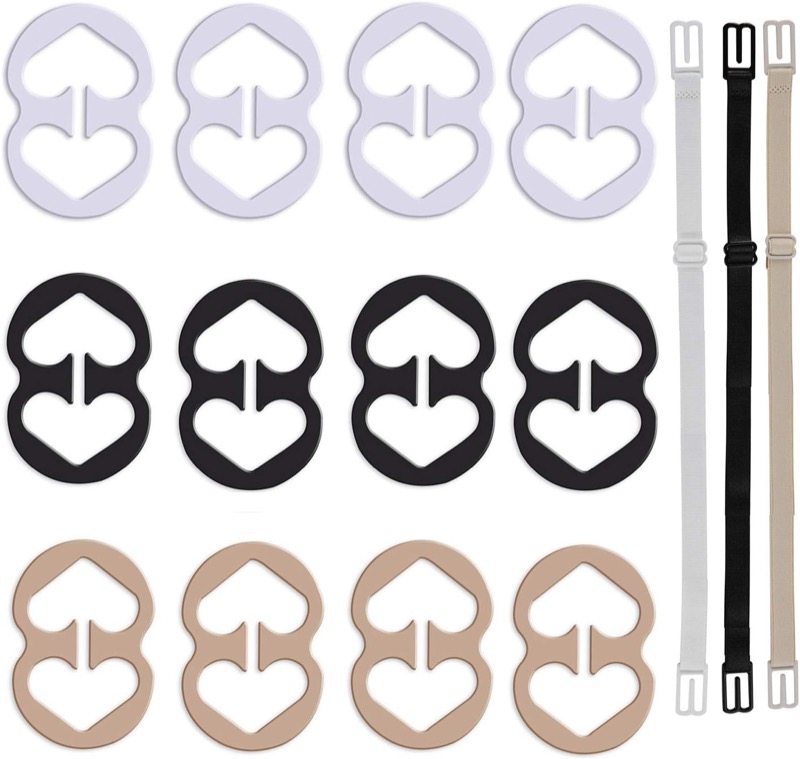
Bra strap clips to make a racerback, multi-pack
A larger pack in several shapes and colours, useful if you want to compare connector styles on different bras. Confirm the pack count and whether the shapes are mixed before you order.
When a clip is the wrong fix
Skip the connector as a first fix if the bra band rides up, the cups move or gape substantially, the strap elastic is exhausted, or the straps are already uncomfortably tight. Start with a fit review or a different bra. If a single strap slips in only one garment, look at styles with straps set farther inward, a built-in J-hook, or a cross-back design.
A clip also changes the line of the straps and can make the back feel tighter even when the band measurement is unchanged. Some people find that comfortable; others do not. A strap converter is a low-cost experiment, not a promise that the bra will fit every body or every outfit. A satin-like strap surface, a loose attachment point and a narrow shoulder can produce different results from the same accessory.
If the bra causes ongoing discomfort, do not keep wearing it simply because a clip holds the straps together.
Match the connector to your straps
Bra clips are sold under overlapping names: racerback converter, strap connector, back clip, J-hook, anti-slip bra buckle. Listings show H-shaped, oval, heart-shaped and adjustable designs. The label is less useful than the attachment method.
Some clips capture each strap in a slot; others require you to form a small loop and slide the piece onto it. A fastener made for a sewn-in loop may not fit a smooth strap with no loop. Check the product instructions against the bra you plan to wear.
Measure the strap width at the back, where the clip will sit, and note the strap thickness and construction. A narrow flat strap may slide out of a loose opening; a thick or padded strap may be difficult to feed through a small one. If you wear bras with different strap widths, test the clip on each one instead of assuming one size fits all. Metal and plastic designs differ in weight, shape and flexibility, but the listing's material name alone does not tell you how secure or comfortable the clip will be.
Look at the shape once attached. It should connect the straps without forcing a sharp kink or pulling the back band upward. A clip that sits close to the neck feels intrusive; one that slides down fails to keep the straps apart where you wanted them. If the connector is adjustable, confirm how it locks and whether the adjustment can move during wear.
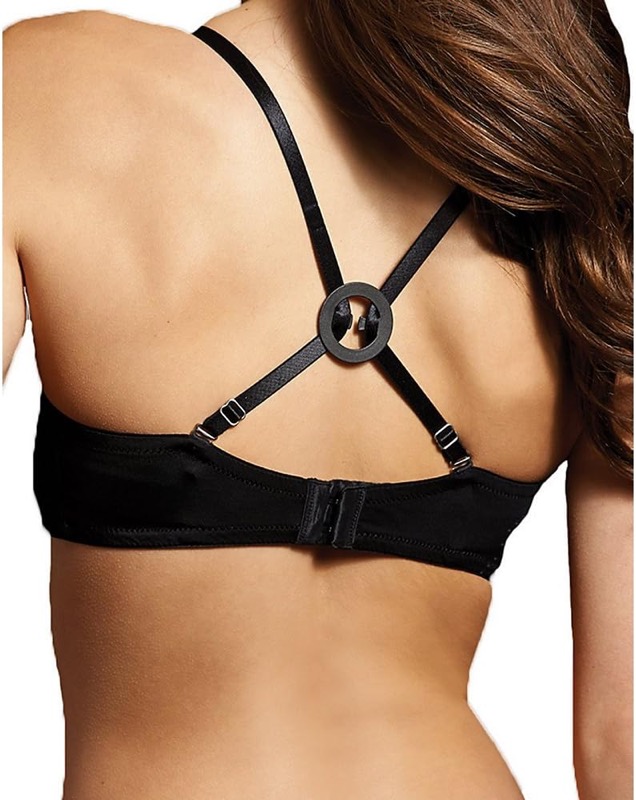
Racer back bra clips, four-piece set
A classic loop-on converter that pulls both straps together behind the back. Check how it attaches before ordering: it needs enough strap to form a small loop, and the strap width has to suit the opening.
What to check before buying
A useful product page shows the clip attached to actual bra straps, not only a standalone glamour photo. Look for a clear installation image, strap compatibility, dimensions or a strap-width range, material, colours, pack quantity, and whether the item is adjustable. If the supplier does not state a width range, ask for the opening dimensions and test with your bra before treating the clip as universal.
Check the fastener's edges and contact points. A rough mould seam, sharp corner or exposed metal edge can catch delicate fabric. On a sample, attach and remove the clip repeatedly, then inspect the strap for snagging, whitening, stretching or permanent creasing. A low-cost item is not automatically tested for repeated use just because the listing says reusable. Ask how it is meant to be cleaned and stored.
If buying a set, confirm whether the stated quantity means one connector or several pieces, and whether different shapes are mixed in one pack. Photos can show three colours while the selected option ships one. Check the selected variant, not the headline.
A simple sample test for brands
If you are sourcing these for a product kit, use at least the strap constructions your product is meant to fit: narrow woven elastic, a wider strap, and any padded or plush strap in the intended range. Record the exact width and thickness of each.
On each sample, attach the connector as instructed, check whether it can be used without assistance, then move the wearer through the same set of arm and torso movements. Note strap escape, connector migration, twisting, band lift, visible marks, snagging and comfort. This is a product-fit check, not a clinical test.
Repeat after removing and reattaching. A connector may work once but loosen after several cycles, especially if the opening is too wide or the material flexes. Inspect the contact area for rough edges and the strap for pulls. Ask a few wearers with different shoulder widths to try the same sample; one person's success does not establish universal fit. Record which bra and strap each result came from, because an accessory can be compatible with one garment and wrong for another.
Before approving a bulk order, make the acceptable range explicit: strap widths, attachment method, material and colour, allowed movement, no sharp edges or strap damage, and a comfortable position after ordinary movement. Agree with the supplier on how a defective sample will be handled and whether the production version uses the same mould and material. A marketplace listing proves this is a standardised accessory category, not the performance of a particular batch.
The useful decision
Even when the clip stops a strap from wandering, check how the new setup feels. Pulling the straps inward changes the line across your back. Some wearers like the firmer hold; others notice pressure between the shoulder blades. One fit-community commenter called a clip the best solution they had found, then added that they had to loosen the straps because the clip felt tight — a useful reminder to test, not proof that the same clip suits everyone.
The decision gets easier once you identify what is moving. If the band and cups stay settled but the straps drift, test a compatible connector. If the band rides up or the cups shift, start with fit. If the clip slides, snags fabric or pinches, take it off.